If you have a scenario where Azure apps needs to access AWS API Gateway endpoint secured by Custom Authorizer then this tutorial will show you how to set up your API with AWS API Gateway, create and configure your Lambda functions (including the custom authorizer) to secure your API endpoints, and implement the authorisation flow so that your users can retrieve the JWT Access Tokens needed to gain access to your AWS API from Azure.
The custom authorizer will confirm that the JWT Access Token (JSON Web Token) have been passed via the authorisation header of the request to access the AWS API. It will verify the RS256 signature if the JWT Access Token using a public key obtained via a JWKS endpoint. It will ensure that the JWT Access Token has the required Issuer (iss) and Audience (aud) claims.
We will achieve this in 4 steps:
1. Step 1 – Configure Azure Service Principal
2. Step 2 – Set up and Deploy the AWS API Gateway
3. Step 3 – Create the Custom Authorizer
4. Step 4 – Secure the API using Custom Authorizer
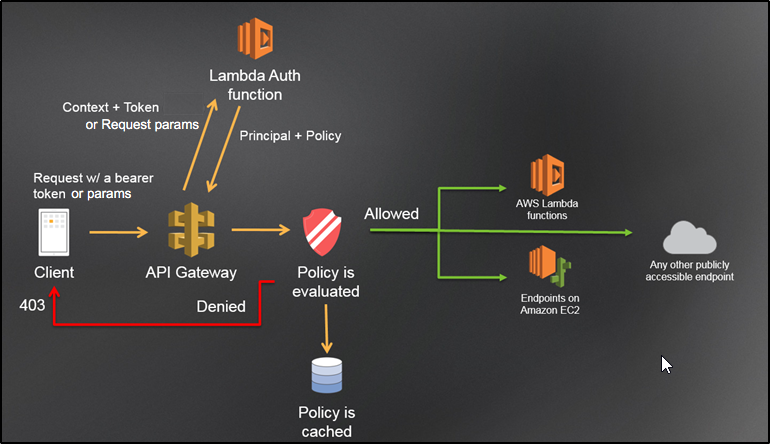
How AWS API Gateway Custom Authorizer work
As per Amazon, an Amazon API Gateway Lambda authorizer (formerly known as a custom authorizer) is a Lambda function that you provide to control access to your API. A Lambda authorizer uses bearer token authentication strategies, such as OAuth or SAML.
When a client calls your API, API Gateway verifies whether a Lambda authorizer is configured for the API method. If so, API Gateway calls the Lambda function. In this call, API Gateway supplies the authorization token that is extracted from a specified request header for the token-based authorizer. You can implement various authorization strategies, such as JSON Web Token (JWT) verification and OAuth provider callout. You can also implement a custom scheme based on incoming request parameter values, to return IAM policies that authorize the request. If the returned policy is invalid or the permissions are denied, the API call does not succeed. For a valid policy, API Gateway caches the returned policy, associated with the incoming token or identity source request parameters. It then uses the cached policy for the current and subsequent requests, over a pre-configured time-to-live (TTL) period of up to 3600 seconds.
Prerequisites:
- Sign up for AWS account (Free tier)
- Sign up for Azure account (Free tier)
Step 1 – Configure Azure Service Principal