In Azure DevOps you can use Kubernetes resources to target Kubernetes clusters in an environment for deployment. You can configure your local Kubernetes cluster using Docker-desktop and then create an environment in Azure DevOps. You can use deployment job in pipeline to deploy your microservice in Kubernetes resource created in environment.
Steps:
Note: It requires a self hosted build agent to be running on this laptop where Docker-desktop kubernetes setup is running.
1. Install Docker-desktop and enable kubernetes. This will create local kubernetes setup on your laptop/desktop.

2. Now create service account, role and rolebinding to allow Azure DevOps to access this local Kubernetes cluster in Docker-desktop. The existing ServiceAccount can be mapped to a Kubernetes resource within your environment to a namespace.
–> Create Namespace
apiVersion: v1
kind: Namespace
metadata:
  name: dev-cluster
–> Create Service-Account
apiVersion: v1
kind: ServiceAccount
metadata:
  name: dev-cluster-svc
  namespace: dev-cluster
–> Create Role
apiVersion: rbac.authorization.k8s.io/v1
kind: Role
metadata:
  namespace: dev-cluster
  name: role-dev-cluster
rules:
- apiGroups: ["extensions", "apps",""]
  resources: ["*"]
  verbs: ["get", "list", "watch", "create", "update", "patch", "delete"]
–> Create Role-binding
apiVersion: rbac.authorization.k8s.io/v1
kind: RoleBinding
metadata:
  name: role-binding-dev-cluster
  namespace: dev-cluster
roleRef:
  apiGroup: rbac.authorization.k8s.io
  kind: Role
  name: role-dev-cluster
subjects:
- kind: ServiceAccount
  name: dev-cluster-svc
  namespace: dev-cluster
Note: You can change scope of Role and name of service and namespace.
3. Now create Kubernetes Resource under Environments in Azure DevOps. Login to Azure DevOps and select Environments under Pipelines as shown-

>>> On the new screen enter Name, description and select Kubernetes as shown-

>> To fill the values on new screen, use the following commands to get the values of cluster, namespace, api server url and serviceaccount’s secret value.
#get cluster names
kubectl config get-contexts

#get api server url
kubectl config view --minify -o jsonpath='{.clusters[0].cluster.server}{"\n"}'

#get service account secret names
kubectl get serviceAccounts dev-cluster-svc -n dev-cluster -o=jsonpath='{.secrets[*].name}{"\n"}'

#get secret value in json format
kubectl get secret dev-cluster-svc-token-7scpf -n dev-cluster -o json

>> Click on “Validate and create”. It will throw error windows as shown. The reason is Azure DevOps not able to reach your local Kubernetes Server Api URL. you can click on “continue anyway”. It will create Environment.
NOTE: The only limitation is that Azure DevOps will not be able to connect to K8s resources to show the service, pods etc in the Environment screen. Also the deployment will work only with self host build agent running on this laptop where docker-desktop kubernetes cluster is setup.

>>> It will show the environment created as shown-

4. Now we will add deployment task in build pipeline-
For my sample project which is in Golang, the pipeline is
trigger:
 - main

pool:
   name: Self-Hosted-Agent

variables:
  - group: dev
stages:
- stage: Build
  jobs:
  - job:
    displayName: Build the application
    steps:
    - task: Go@0
      displayName: "Go Get"
      inputs:
        command: 'get'
        arguments: '-d'
        workingDirectory: '$(System.DefaultWorkingDirectory)'
    - task: Go@0
      displayName: "Go Build"
      inputs:
        command: 'build'
        workingDirectory: '$(System.DefaultWorkingDirectory)'
    - task: qetza.replacetokens.replacetokens-task.replacetokens@3
      displayName: 'Replace image version in deployment.yaml'
      inputs:
        rootDirectory: '$(System.DefaultWorkingDirectory)'
        targetFiles: 'deployment.yaml'
        tokenPrefix: '#{'
        tokenSuffix: '}#'
    - task: CopyFiles@2
      inputs:
        SourceFolder: '$(System.DefaultWorkingDirectory)'
        Contents: 'deployment.yaml'
        TargetFolder: '$(Build.ArtifactStagingDirectory)'
    - task: PublishBuildArtifacts@1
      inputs:
         artifactName: drop

    - task: Docker@2
      displayName: Build an image
      inputs:
        command: build
        dockerfile: '$(System.DefaultWorkingDirectory)/Dockerfile'
        buildContext: '$(System.DefaultWorkingDirectory)'
        repository: $(AWS_ECR_MAGE_URI)

    - task: ECRPushImage@1
      inputs:
        awsCredentials: 'AWS_Service'
        regionName: $(AWS_REGION)
        imageSource: 'imagename'
        sourceImageName: $(AWS_ECR_MAGE_URI)
        sourceImageTag: $(Build.BuildId)
        pushTag: $(Build.BuildId)
        repositoryName: $(AWS_ECR_REPOSITORY_NAME)
- stage: Dev
  dependsOn: Build
  jobs:
  - deployment:
    displayName: Dev deploy
    environment: dev
    strategy:
     runOnce:
       deploy:
         steps:
           - script: kubectl apply -f deployment.yaml
             displayName: 'Dev Deploy'
Deployment.yaml is
apiVersion: apps/v1
kind: Deployment
metadata:
  name: helloworld-deploy
  namespace: dev-cluster
  labels:
    app: hello-world-deploy
spec:
  replicas: 1
  selector:
    matchLabels:
      app: hello-world-app
  template:
    metadata:
      labels:
        app: hello-world-app
    spec:
      containers:
      - name: helloworldapp
        image: 706949302588.dkr.ecr.ap-southeast-2.amazonaws.com/test-hello-world:#{Build.BuildId}#
        imagePullPolicy: IfNotPresent
        ports:
        - containerPort: 8080
        resources:
          limits:
            cpu: 100m
            memory: 512Mi
          requests:
            cpu: 100m
            memory: 512Mi
      securityContext:
        runAsUser: 1000
      imagePullSecrets:
      - name: aws-registry


---

apiVersion: v1
kind: Service
metadata:
  labels:
    app: hello-world-svc
  name: hello-world-svc
  namespace: dev-cluster
spec:
  ports:
  - name: helloworld
    nodePort: 30423
    port: 8080
    protocol: TCP
    targetPort: 8080
  selector:
    app: hello-world-app
  sessionAffinity: None
  type: NodePort
When you run the pipeline, no need to provide Kubernetes connection details. Only Environment name needs to be set in Dev stage. It deploys the pods and service into the cluster based on resource set for Dev environment.
The deployment will look like below screen after successful deployment-


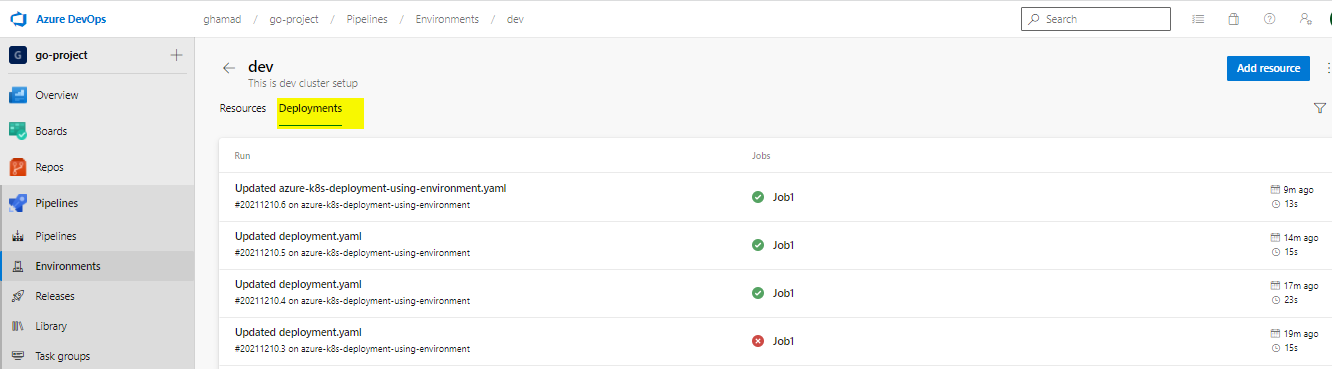
Also under Environments you can see the deployments

Reference:
https://docs.microsoft.com/en-us/azure/devops/pipelines/process/environments-kubernetes?view=azure-devops