Lets say you have self hosted private build agents running in Azure VMs. These may include multiple Windows and Linux based VSTS Build Agents. To save cost on these VMs you can create Azure Automation Account and runbook to automatically start/stop these VMs and build agents running on them. You can get more details about it in this article- How to automatically start/stop existing Azure Linux VM as well as the VSTS build agent running on it.
We will further explore azure pipeline supported feature to make it more efficient. In this article we will see how you can use “Schedule release trigger” feature of Azure Release Pipeline to schedule deletion & creation of the VM and configuration of VSTS build agent. Using this you can delete the VM out of office hours and again create it before start of office. Also the ARM script can be used to install and configure VSTS Build Agent. This is very cost effective as well as keeps a check on the the Build Agent environment (repetitive tested).
Steps:
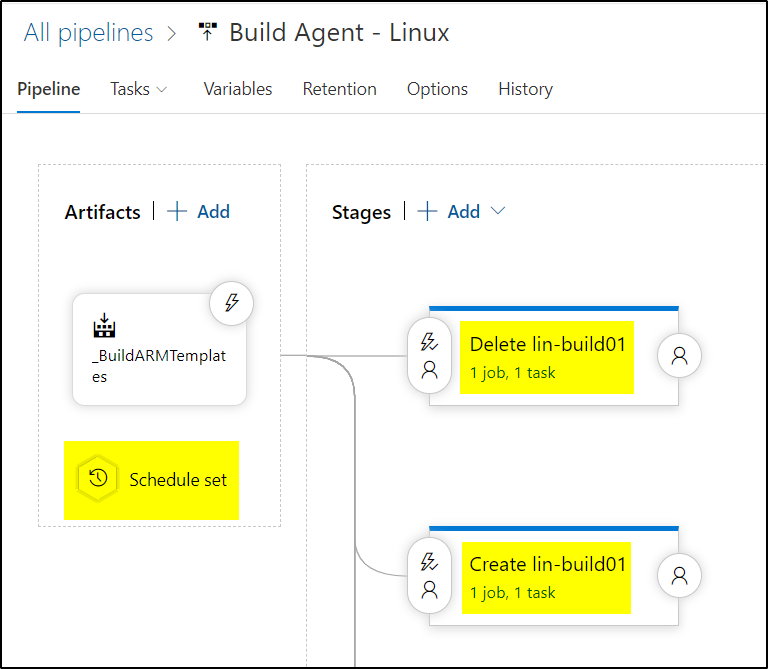
>> Create Pipeline with main two task- “Delete lin-build01” and “Create lin-build01“.
>> “Delete lin-build01” will delete the VM, Network Interface, Public IP, and Disk storage. You can use the below script and enhance it if required for scenario-
# You can write your azure powershell scripts inline here.
# You can also pass predefined and custom variables to this script using arguments

Function Remove-AzureVMNICPIPOsDisk
{
[cmdletbinding()]
Param (
    [Parameter(Mandatory=$true)]
    $rgName,
    [Parameter(Mandatory=$true)]
    $vmName
)


#Function for error checks
Function ErrorCheck{
If ($errorck -ne $null)
{
Write-host
Write-host -ForegroundColor Red "ERROR: " -NoNewline
Write-Host -ForegroundColor Red $errorck
Write-host
Break
}
}

Write-Host
Write-Host "______________________________________________________________________"
Write-Host -ForegroundColor Green "Starting Clean-up for Virtual Machine $vmName."
Write-Host "______________________________________________________________________"
Write-Host

#Get details of VM
$vm = get-azurermvm -ResourceGroupName $rgName -Name $vmName -ErrorVariable errorck
ErrorCheck

#Deleting VM
Write-Host -ForegroundColor Green "Deleting Virtual Machine $vmName"
$hout = Remove-AzureRmVM -ResourceGroupName $rgName -Name $vmName -Force -ErrorVariable errorck
ErrorCheck

#Use VM details to identify and delete NIC, PIP and OsDisk
$nics = $vm.NetworkProfile.NetworkInterfaces.id
$nics | % {
$nicName = $_ -replace '.*?interfaces/',""

$nic = Get-AzureRmNetworkInterface -ExpandResource NetworkSecurityGroup -Name "$nicName" -ResourceGroupName $rgName

$pipName = $nic.IpConfigurations.Publicipaddress.Id -replace '.*?addresses/',""
Write-Host -ForegroundColor Green "Deleting network interface $nicName"
Remove-AzureRmNetworkInterface -Name "$nicName" -ResourceGroupName $rgName -Force


if ($pipName -ne $null)
{
Write-Host -ForegroundColor Green "Deleting Public IP '$pipName'"
Remove-AzureRmPublicIpAddress -Name "$pipName" -ResourceGroupName $rgName -Force
}

}

#Use VM details to identify OS disk
$osDisk = $vm.StorageProfile.OsDisk

#Deleting OS disk
$vhdResourceID = $OsDisk.ManagedDisk.Id
Write-Host -ForegroundColor Green "Deleting OS Disk: $vhdResourceID....."
Remove-AzureRmResource -ResourceId $vhdResourceID -Force | Out-Null


Write-Host " "
Write-Host "______________________________________________________________________"
Write-Host -ForegroundColor Green "Clean-up for Virtual Machine $vmName completed."
Write-Host "______________________________________________________________________"
Write-Host " "
}

Remove-AzureVMNICPIPOsDisk -rgName "$(ResourceGroupName)" -vmName "$(vmName)"

>> “Create lin-build01” will use ARM template to create the VM. It will install VSTS Build Agent and configure it. This way the build agent will be ready before work starts. You can get more details for this task here- how-to-create-linux-ubuntu-vsts-build-agent-using-arm-template-in-visual-studio-2017

>> Once the tasks are created, now set the schedule of each. Here first you should set “Scheduled Release Trigger”. Select the icon “Schedule set” on Artifacts section and provide the days, time and timezone as shown below. The below setting will schedule the pipeline to run on 5 week days at 8:15 pm.

>> Now set schedule for the “Delete lin-build01” task. Click on “Pre-deployment conditions” icon as highlighted. Then enable the schedule. The below schedule runs for 5 week days at 8:16 pm. So the pipeline will schedule at 8:15 pm and this deletion task will start at 8:15 pm to delete the VM.

>> Now set schedule for the “Create lin-build01” task. Click on “Pre-deployment conditions” icon as highlighted. Then enable the schedule. The below schedule runs for 5 week days at 6:00 am. So the pipeline will schedule at 8:15 pm but this creation task will start at 6:00 am to create the VM. Hope this clarifies how it works.

The Release pipeline will start at 8:15 pm everyday and schedule the tasks. The scheduled tasks will run at their scheduled time of 8:16 pm and 6:00 am respectively.
This is awesome feature of release pipeline and works without a hitch.