Scenario:
You are using Azure Build & Release pipeline for your project. Your plan is to deploy the build artifacts to on-premise Kubernetes using Release pipeline. You are not sure how to allow the Release pipeline to access your Kubernetes cluster and namespace so that the resources like service, pods, secrets etc can be deployed.
Solution:
Azure DevOps provides option of creating Service Connections to different devices like AWS, Docker, Chef, Kubernetes etc. You can find more details at
In this article we will see how to create Kubernetes service Connection using
- Service account
Steps:
>>> Connect to Kubernetes Cluster and create a service account in the namespace. Here a service account “devops-kubernetes-svc” is created in namespace “connect-devops”
kubectl create serviceaccount devops-kubernetes-svc -n connect-devops

>>> Create Role or ClusterRole and Rolebinding for this service account.
apiVersion: rbac.authorization.k8s.io/v1
kind: Role
metadata:
  name: role-for-serviceaccount
  namespace: connect-devops
rules:
- apiGroups: ["*","apps","extensions"]
  resources: ["*"]
  verbs: ["get", "list", "watch", "create", "update", "patch", "delete"]
apiVersion: rbac.authorization.k8s.io/v1
kind: RoleBinding
metadata:
  name: rolebinding-for-serviceaccount
  namespace: connect-devops
subjects:
- kind: ServiceAccount
  name: devops-kubernetes-svc
  namespace: connect-devops
roleRef:
  kind: Role
  name: role-for-serviceaccount
  apiGroup: rbac.authorization.k8s.io
kubectl apply -f role.yaml

kubectl apply -f rolebindings.yaml

NOTE: When using the service account option, ensure that a RoleBinding exists, which grants permissions in the edit ClusterRole or Role to the desired service account. This is needed so that the service account can be used by Azure Pipelines for creating objects in the chosen namespace.
>>> Use the following command to fetch the Server URL.
kubectl config view --minify -o 'jsonpath={.clusters[0].cluster.server}'
Copy and keep this Server URL ready for later use.
>>> Use the following sequence of commands to fetch the Secret object that’s required to connect and authenticate with the cluster.
kubectl get serviceAccounts <REPLACE-service-account-name> -n <REPLACE-namespace> -o 'jsonpath={.secrets[*].name}'
>>> In the following command, replace the service-account-secret-name with the output of the previous command.
kubectl get secret <service-account-secret-name> -n <namespace> -o json
Copy the Secret object fetched in JSON form. This will be pasted in the Secret text-field later.
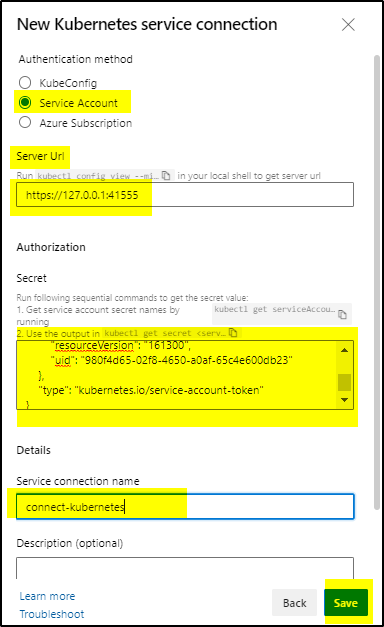
>>> Login to Azure DevOps project and click on Project settings as shown

>>> Click on Service Connections and then New service connection

>>> Select Kubernetes and click Next

>>> Select Service Account radio button, paste the Server URL which was copied earlier and also paste the JSON format secret in the text field. Provide a name to this connection and Save it.
>>> Now you have the Service connection ready to be used in pipeline to connect to namespace in Kubernetes cluster.